Showing posts with label Food. Show all posts

10/31/12

Delicious Pumpkin Pie


It is that time of year.  When the air gets crisp, the leaves say goodbye in brilliant shades of red and orange.  It's a beautiful time of year...and the best time to whip up a delicious, pumpkin pie.  Whether you make this for Thanksgiving, or just as the piece de resistance to a Sunday dinner, just promise me you'll make it!  This is another of my husbands grandmothers recipes.  My husband likes pumpkin pie, but he loves this recipe.  Even I have to admit it was sinfully delicious.  To make this pumpkin pie even better, is it is a very, very simple pie to make.  Seriously. So it's great for a beginner!
This time of year you should have most of these ingredients in the pantry.  Evaporated milk, regular milk, canned pumpkin, eggs, spices, and sugar.  So simple!
I have the bad habit of never cracking my eggs separately and then beating them.  I always put the eggs in first, beat, and then add everything else.  I have to say I am SO proud of these eggs.  My chickens are such hard workers providing us with tons of fresh, perfect eggs!
Pardon my thumb!  While writing this post, and looking over the directions I really just DIYed this pumpkin filling.  The directions say to combine the pumpkin, sugar, salt and spices, then blend in your eggs, milk and evaporated milk.  I did the eggs, and then just added everything else.  Like I said earlier, this is basically no fail!
Next, poke holes in your pie crust! (Which I forgot to do until after I started to pour.  I did poke holes, you just can't see them!)  Anytime you make a pumpkin pie and pour in the filling it will get very full.  Like, can hardly keep from spilling it, kind of full.  I've even had some that didn't totally fit in the crust!  Make sure if you do a store bought crust to get deep dish.  If you do your own crust use a deeper dished pie pan.
Ta da!  Beautiful isn't it?  I wish I had a picture of it when it was done, but it did NOT last long enough.  We had it with my parents one evening and it was so, so good.  My husband and my parents like a nice dollop of cool whip on top.  I however, eat it plain.  I cannot stand cool whip!

Below is a printable of the recipe.  Try it out, and consider adding it to your holiday dinners.  Enjoy!


10/29/12

Easy Peasy Pie Crust

I have a secret.  I have been cooking for quite a few years now.  I have made boeuf bourgignon, I have made full thanksgiving dinners, I have even made pumpkin bread pudding with vanilla creme anglaise and a spicy caramel apple sauce!  I have not, however, made a successful pie crust.  It's just one of those things I struggled to master.  Until now!  This is my husbands grandmothers recipe.  This recipe is simple, and creates a perfect, flakey crust.  I would encourage you to give it a try, and use it as your go to recipe this year for the holidays!
For this recipe you will need shortening, salt, all purpose flour and water.  You will want ice cold water, and cold shortening.  Why the cold water and shortening?  You want things cool because it keeps the shortening from melting and fully mixing with the flour.  When you bake your crust, the fat melts and the liquid steams the pockets made when the fat melted.  This is what makes a heavenly flakey crust.
Here is our shortening measured out and ready to be chilled.  I just stuck mine in the freezer until I was ready for it.  It was nice and cool and as far as I could tell perfect!

You will want to measure your flour and salt in a mixing bowl, and then add your chilled shortening.  Then you will want to take a fork or pastry cutter and incorporate the shortening into the flour.  You will want the shortening to be in pea sized lumps.  I know you may want to just mix it all together, but resist that urge!
I was tempted not to follow this next piece of instruction.  I just kept thinking it couldn't really matter how you added the water.  However, I went ahead and did it anyway.  The directions say to sprinkle 1 tablespoon of water over part of the flour and shortening mixture.  Gently toss, and push to one side of the bowl.  Then sprinkle the next tablespoon over the dry part; toss; push to moistened side.  Repeat until all flour mixture is moistened.  Again, resist the urge to mix it well.  Just a gentle toss and push it to the side.
 Next you will want to gather the dough up and form a ball.  At this point you would divide it if you were making a top and bottom crust.  I was just doing a bottom crust.
You will want to flour your workspace, smush down your dough, sprinkle flour on it and then start to roll it out.  I always flour my rolling pin as well.  Another great piece of wisdom this recipe held was to always roll from the center of the dough to the edge.  Great advice!  It helped me keep this round versus some funky rectangular shape.
Take your pie pan/plate and set it upside down on your dough.  Cut around it.  In retrospect after doing this I had a lot of dough overhanging.  I was just guessing!  On the plus side though it is easier to take dough away than to add it back!
This is hopefully how your dough will look now!  A fairly evenly rolled out round circle of dough.  Ready for the next step?  It may change your life...really.
Set you rolling pin on one edge of your dough, and wrap it around your rolling pin.  Put your pie pan/plate in place, and then unroll the dough over your pie pan/plate!  Ingenious!  How many times have you made a dough only to have it get all broken, cracked, and otherwise disfigured before it even reached it's destination?!  I can't have been the only one!
Almost done!  Just push the dough down, and trim up the edges.
TA-DA!!!  To get the cute edges you push the dough against your finger.  It sounds confusing, but I promise it isn't!  Click here to see how to do this, and fancier crusts.

That's it!!  Some pies will require you to prebake this crust, and others allow you to just add the filling and bake.  Another piece of advice is to use a fork to prick some holes in the bottom before baking either way.  It prevents big air bubbles from forming.

Well, I hope you enjoyed this tutorial, and even more I hope you get in the kitchen and try it out!  Coming soon...pumpkin pie filling to go in this lovely shell!  Stay tuned!

Oh, and here's a printable of the recipe...enjoy!


Growing Home

8/29/12

Lasagna

(I'd like to take a moment and thank anyone and everyone who has voted for what types of blog posts they would like to read!  Please keep voting as I love to know what it is YOU as readers want to read!  I've also added a new page, labeled the Suggestion Box .  I wanted to give my readers the ability to anonymously (or not!) send in any questions, or specific ideas for blog posts.  Lets say you want to know the real deal on raising chickens, baking bread, resolving conflict in a relationship, or something else, this will let you connect to me personally with the ability to remain anonymous.)

Lasagna sounds so difficult to make.  It's one of those meals you think "I could NEVER make that!"  However, lasagna is very easy to make, and only requires about 30-40 minutes of prep before it's ready to slide into the oven.  This lasagna recipe is AMAZING.  It has over 6000 reviews on allrecipes and has a five star rating.  It's one of my husbands favorite meals ever!  When I made this there was actually enough that I made two separate foil pans.  One I put away for the freezer, the other we had that night.  Ok, here we go!


Fairly easy to find, normal ingredients.  The things you'll need are:   sweet italian sausage (or italian sausage), ground beef, onion, garlic, crushed tomatoes, tomato paste, tomato sauce, sugar, basil leaves, fennel seeds, italian seasoning, salt, pepper, parsley (optional), noodles, ricotta, egg, mozzarella, and parmesan.  Large list, but so worth it.


First you want to brown your sausage, beef, onion, and garlic over medium heat until browned.  TIP:  to get fairly fine hamburger and/or sausage while cooking I suggest using a sauce pan vs a saute pan.  Put your meat in and stir it every 5 or so minutes until fully cooked.  Stirring it gives it a nice non-chunky texture.


Once the meat is browned, add in your tomato products, 1/2 cup of water, sugar, basil, fennel, italian seasoning salt, pepper, and parsley.  Let this simmer for about 1 1/2 hours.

REMINDER:  I think a lot of times you can substitute seasonings.  For example you could use all italian seasoning if you didn't have basil.  However, DO NOT leave out the fennel unless you hate it.  Fennel is a very pronounced flavor in this dish, and would be lacking if it was left out!


Put your ricotta, egg and some salt together in a bowl and...


Combine well!

TIP:  Room temperature ricotta and egg will help the ricotta smear onto the noodles easier.


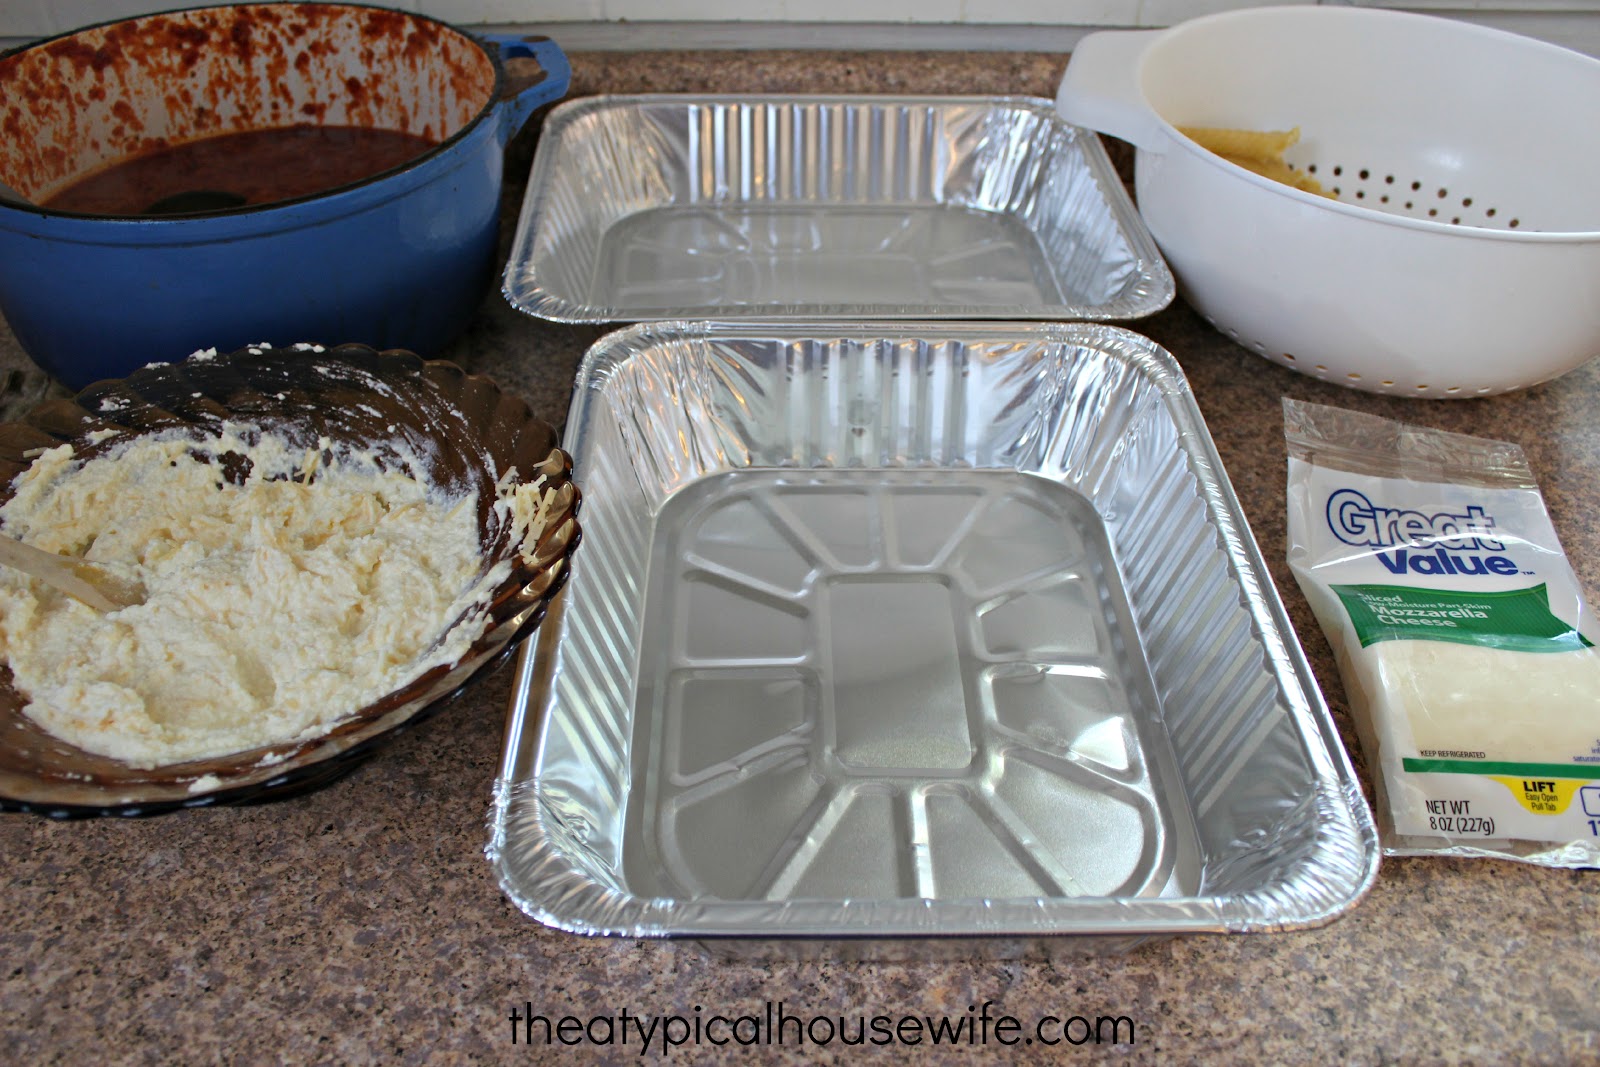
Get ready to assemble!  It makes it easier to have everything at hand, and ready to go.

REMINDER:  If you get the layers wrong, or it gets sloppy, don't stress.  It make look like a mess, but it will still taste like heaven!


You are going to layer your ingredients.  First put some sauce down.


Next is time for noodles!  The odd colors are what happens as they get a little dry.


Smear on your ricotta, top with a layer of mozzarella cheese slices.

Repeat!!

Cover with foil, and bake.  Be prepared for pure bliss!

World's Best Lasagna Recipe
by Johnchandler at allrecipes.com

Ingredients

1 pound sweet Italian sausage
3/4 pound ground beef
1/2 cup minced onion
2 cloves garlic, crushed
1 (28 ounce) can crushed tomatoes
2 (6 ounce) cans tomato paste
2 (6.5 ounce) cans tomato sauce
1/2 cup water
2 tablespoons white sugar
1 1/2 teaspoons dried basil leaves
1/2 teaspoon fennel seeds
1 teaspoon Italian seasoning
1 tablespoons salt
1/4 teaspoon pepper
4 tablespoons chopped fresh parsley
12 lasagna noodles
16 ounces ricotta cheese
1 egg
1/2 teaspoon salt
3/4 pound mozzarella cheese, sliced
3/4 cup grated Parmesan cheese

Directions

In a Dutch oven, cook sausage, ground beef, onion, and garlic over medium heat until well browned. Stir in crushed tomatoes, tomato paste, tomato sauce, and water. Season with sugar, basil, fennel seeds, Italian seasoning, 1 tablespoon salt, pepper, and 2 tablespoons parsley. Simmer, covered, for about 1 1/2 hours, stirring occasionally.

Bring a large pot of lightly salted water to a boil. Cook lasagna noodles in boiling water for 8 to 10 minutes. Drain noodles, and rinse with cold water. In a mixing bowl, combine ricotta cheese with egg, remaining parsley, and 1/2 teaspoon salt.

Preheat oven to 375 degrees F (190 degrees C).

To assemble, spread 1 1/2 cups of meat sauce in the bottom of a 9x13 inch baking dish. Arrange 6 noodles lengthwise over meat sauce. Spread with one half of the ricotta cheese mixture. Top with a third of mozzarella cheese slices. Spoon 1 1/2 cups meat sauce over mozzarella, and sprinkle with 1/4 cup Parmesan cheese. Repeat layers, and top with remaining mozzarella and Parmesan cheese. Cover with foil: to prevent sticking, either spray foil with cooking spray, or make sure the foil does not touch the cheese.

Bake in preheated oven for 25 minutes. Remove foil, and bake an additional 25 minutes. Cool for 15 minutes before serving.

All credit for this amazing recipe goes here.

8/23/12

Did You Know

Louisiana House Bill 195 bans cash for second hand transactions. (7)

US Senate passes 'indefinite detention' bill.  If you are a suspected terrorist you can be detained with no trial, and no lawyer. (7)

What is a suspected terrorist?  Having more than 7 days of food makes you a suspected terrorist.  Missing fingers, and buying flashlights are also reasons someone could be considered a terror suspect. (1)

Something called TBHQ is found in frozen, packaged, or pre-made processed foods with long shelf lives such as frozen meals, crackers, chips, cereal bars and fast food. (2)  What is TBHQ?  It's butane. Yum.

Cows milk is full of estrogen.  Unlike cows of previous generations, today's dairy cows are kept pregnant nearly all the time.  Milk from a cow in the late stage of pregnancy contains up to 33 times as much of a signature estrogen compound (estrone sulfate) than milk from a non-pregnant cow. (3)

There is propylene glycol in cake mixes, salad dressings, low fat ice creams and dog food.  So what is propylene glycol?  Oh, it's just this little thing called antifreeze. (2)

There is also wood pulp in your artificially flavored yogurt, baked goods, candy and sodas. (2)

There is also something called castoreum that is used to make artificial raspberry flavoring.  But where does the castoreum come from?  It's kind of organic being as it comes from the anal glands of beavers. (2)

Sodium nitrates are in deli meats, hot dogs, etc.  They have also been linked to gastric cancer and oesophageal cancer. (4)

There are parabens in deodorant, shampoo, makeup, lotions and oral care products.  Not to mention being found in processed food items and some pharmaceutical products.  Why would I want to steer clear of parabens?  Oh, only because parabens are found in virtually all breast cancer tumors. (5)

Have you heard of senate bill s510 that was passed?  It makes it illegal to grow, share, trade or sell homegrown food.  (6)

It's insane the laws that have passed and are in effect.  It makes me afraid for where we are headed.  Why are Americans so unhealthy?  Well, maybe it's the chemicals we're eating on an everyday basis!  The worst part of all this is most of the laws passed some time ago and I am just now hearing about them.  It's also amazing these food additives have been used for years now but we are just now learning about them and their adverse effects.

Have you heard of these laws and facts before now?  Do they concern you?  What are your thoughts?

Sources:

(7) Canadian Rant About USA!- This is a youtube video.  She does curse a few times, just to forewarn anyone who is going to watch.

1/25/12

Baba Ganoush


Have you ever heard of baba ganoush before??  It's a very interesting, yet very yummy eggplant dip.  I had never, ever tried it before making it on Sunday.  It ended up being wonderfully delicious, albeit a little different and weird at first!  Eggplants are definitely some of the weirdest veggies out there.  At the bottom of this page is a link to the printable version, as well as some nutritional information.

------------------------------------------------------------------------------------------------------------

Baba Ganoush-Orignial recipe from The Little Ferraro Kitchen


 Our ingredients for this are eggplants, garlic, paprika, cumin, extra virgin olive oil, lemon juice, and tahini.  Have you ever had tahini?  Me either until Sunday!  It's a sesame seed paste.


First, you want to wash your eggplant, and cut them lengthwise.


You also want to cut the top off of an entire head of garlic.  My garlic was starting to grow sprouts, some people would toss their garlic at this point, however, I used it anyway.


Lay your eggplant on a sheet of foil...


And wrap them up in foil.  You also want to wrap up the garlic in foil as well.  Put it on a baking sheet and slide it in the oven.  It doesn't take long until it will fill your entire house with a lovely garlicky smell!


Gross little suckers aren't they?!  Take a spoon and scrape your eggplant out.  You don't want any of the skin though, so be careful.  Scoop out the flesh and add it to your food processor, or blender.  You can also probably use a hand mixer, kitchen aid, or by hand with some elbow grease.


Anyone out there roast garlic before?  This is what happens, it turns into almost a paste.  You just squeeze the entire thing and it just gooshes out.  Because it's roasted it has a much milder flavor, not as harsh and strong as fresh garlic.  Just squeeze it in with the eggplant.


You'll want to shake your tahini, and add it to the garlic and eggplant.  This stuff is very interesting!  It tastes kind of like peanut butter, but more sesame-y.  We had a heck of a time finding it.  It wasn't at walmart, and when we got to our local Sunfresh, we didn't see it on the ethnic isle either.  In our grocery store there was ethnic foods on one side, and olives, pickles, and dressings on the other.  The tahini ended up being with the salad dressing.  So in case you decide to make this, you may have to do some searching for it!


I did this at my moms, so I just took my hand cranked food processor, this is everything, including the lemon juice, and spices, waiting to be processed!


Here is the final dip.  You put it in a bowl, drizzle it with a little olive oil, and sprinkle with paprika.


Like I said, this is a very interesting flavor.  When I first put it in my mouth, I was dismayed.  When it first hit my tongue, I didn't taste anything.  Then I started tasting everything!  It's very garlicky, not spicy, fairly creamy, and sort of earthy because of the tahini. I was very surprised that Rob really enjoyed this as well, though not as much as me.

Have you ever had baba ganoush before?


1/23/12

Ch-Ch-Ch-Changes.

As I mentioned in my post on Friday, I’m turning 25 next month.  This type of birthday could trigger many, many different feelings.  Such as, but not limited too…

I’m getting old.
I have wrinkles.
I’m not a spring chicken anymore.
I may as well just buy a cane, and get it over with.
High waisted pants? Why not.

But, I’ve already decided not to focus on any of the negatives.  Instead, I want to be a woman who embraces getting older.  I have noticed some changes in myself though.  I’m learning there are things I want for myself and for my life.  One of these changes is in eating habits.  One of my goals for 2012 is to eat more colorfully.  Fruits and veggies, people, not m&m’s and skittles!


I've never been a picky eater.  I've always been willing to try anything, and growing up we always had salads, green beans, and I've always liked beets.  I may not have been in love with these things, but I ate them.  Then I met Rob, and his eating habits kind of rubbed off on me.  We ate out more, and when I cooked I made sure to avoid veggies at all costs.  Now I’m getting older, and I am realizing more and more that health is important.  I’m realizing organic would be ideal, and I am a big advocate for eating sustainable foods, and treating the animals you eat with kindness. There are a few problems though.  Although these things are good, and they are things I want to work towards, they are not possible for us right now.  What is possible is eating more vegetables, and fruits, and making better decisions when it comes to food in general.  This means some changes are coming to this blog!  You may be wondering, “What types of changes?”  Well, these types…

I’m going to be posting recipes at least once a week.

I plan to post healthy recipes, and maybe some far from healthy recipes.

I refuse to use low-fat, no-fat, and or fake ingredients, including margarine, or artificial sugars.  I think these foods are altogether bad for us, and I think we should eat butter…just not a stick at a time.

I plan to post nutritional information with all the recipes.

I plan on having step by step pictures to go with the recipes.

I plan on recipes that are not run of the mill (at least to me).  I like to try new foods, and I intend to make you try new foods too!

Sound like fun? Good, because here’s the first recipe!
------------------------------------------------------------------------------------------------------------
Oven Baked Spinach Chips

Original Recipe from: The Indolent Cook

This is such a simple, healthy, and ridiculously yummy snack.  Let me start by saying I really enjoy spinach.  It’s my favorite type of green to use for salads because, as far as I can tell, it doesn’t have a strong lettuce/green flavor.  The only thing I’m not crazy about are the stems.  I may or may not try to pluck them off.  However, I left them intact and ate them when I made them this way!


 Here are the items you need, extra virgin olive oil, and spices.  The original recipe called for garlic salt which I didn't have, so instead I used salt and garlic powder and then I went fairly heavy on the chili flakes. I really enjoy spicy foods.  I have no doubt these would be just as good just lightly salted, with or without pepper, or garlic powder.  Feel free to experiment.

You’ll want to wash and thoroughly dry your spinach, and in my case I went ahead and put it on my cookie sheet lined with aluminum to season.


I drizzled with olive oil, and then added my spices and mixed them in.


You want to make a layer with the leaves close together, maybe slightly overlapped, but not whole leaves on top of other leaves.


Then you just slide them in the oven and wait.


About 10 minutes later pull your cookie sheet out, and burn a finger plucking a leaf up.  They are completely firm, and incredibly delicate.  They literally just crumble and melt in your mouth.